When it comes to overlanding, your battery setup is one of the most crucial choices you’ll have to make. The last thing you want is for your battery to die in the middle of nowhere.
In our opinion, the best battery for overlanding is the Dakota Lithium DL+ 280ah as a replacement for your vehicle’s starter battery.
However, this setup is also the most expensive. You may be better off using a dual battery setup by adding a house battery, which we’ll talk about as well.
The right setup for your overland adventures depends on your vehicle, budget, and power needs. So, let’s find out which is the right choice for you.
What You Need to Know About Overlanding & Batteries
***Disclaimer: if you’re not totally confident in what you’re doing when wiring or handling any electrical equipment, always consult a professional. There’s some DIY advice below but put your safety first if you’re unsure.
Vehicle batteries are a crucial part of any overland rig. From starting the engine to powering the headlights and your devices, you can use a single battery or dual setup.
A dual battery setup separates your “starter battery” (for engine and vehicle usage) from your “house battery” (for home comforts and personal devices). If one fails, the other isn’t affected.
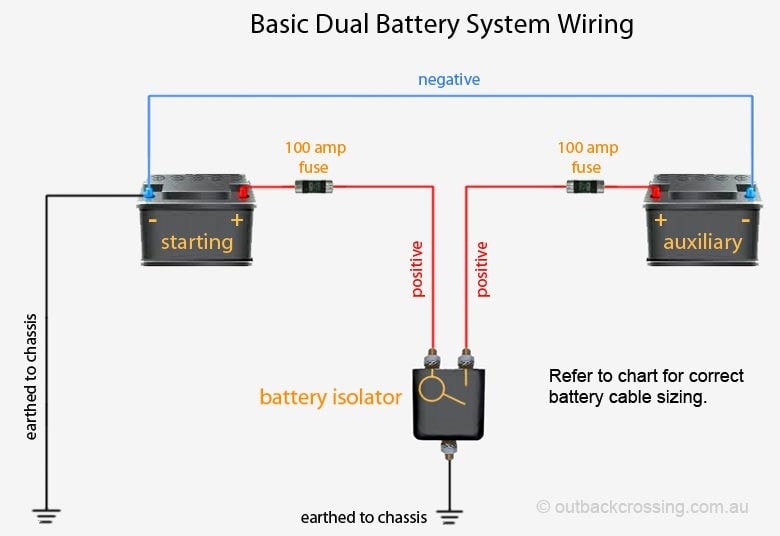
Image Source: http://www.outbackcrossing.com.au/
While dual battery systems can give you more power, a single lithium battery (such as the Dakota Lithium DL+ 280ah) can replace your OEM starter battery and be used as a house battery for a less complex system. Just make sure you understand the risks of only using one battery in the wild and bring a portable jumper pack in case of power failure.
The 3 Types of Deep-Cycle Batteries for Overlanding
A deep-cycle battery is designed to use most of its capacity and be regularly deeply discharged. That’s why they’re so popular for overlanding.
A starter (or cranking) battery provides a short burst of power and only discharges a tiny percentage. After that, the alternator takes over to power the vehicle. “Deep cycle” refers to the level of discharge that comes from providing sustained energy.
Here are the three types you need to know about:
1. Traditional Lead-Acid Batteries
Lead-acids are the most common type of vehicle starter battery. Unless you’ve switched it out, your truck or camper probably came with one. They also come in deep-cycle form, mostly used for powering a vehicle’s electrical system.
Here’s what a typical lead-acid battery looks like:
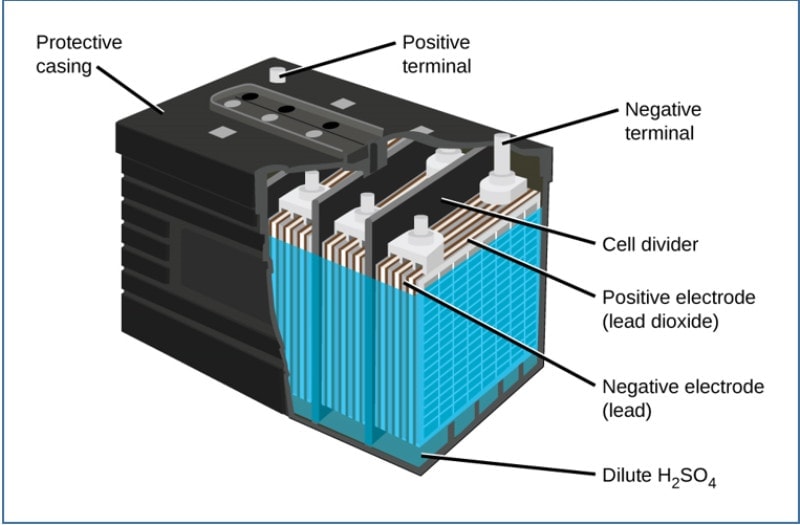
Image Source: https://www.upsbatterycenter.com/
These kinds of batteries are:
- Cheap options compared to other types
- Easy to use and recharge
- Powerful starter batteries
However, they also have a few disadvantages. They have a low power density, poor depth of discharge, and are usually large, heavy models. They also contain toxic lead acid, which can harm you or catch fire if it spills.
2. AGM (Absorbed Glass Matt) Batteries
AGM is a bit of a buzzword in the overlanding industry. Really, they’re just a more advanced form of lead-acid battery, developed by the military in the 1980s. The “absorbed glass matt” refers to the thin glass fiber separator between the plates that helps absorb the battery acid.
Compared to lead-acid, AGM batteries are:
- Less expensive (typically with a 2x longer lifespan)
- More reliable (with a greater tolerance to heat and cold)
- More durable (better resistance to vibration)
- Safer (no free-flowing electrolyte means no hazard of spilling)
Unfortunately, they gradually reduce their charging capacity over time. They’re also sensitive to overcharging which can shorten their lifespan.
Whichever you choose, these are a popular choice for starter batteries (that get your engine going) but can be used as house batteries as well.
3. Lithium Batteries
Lithium batteries are split into two categories with slightly different chemistries:
- Lithium-ion batteries
- Lithium iron phosphate (LiFePO4)
Lithium-ion batteries are used to charge most cellphones and other mobile devices. As technology has developed, new lithium-ion and LiFePO4 batteries have been created for automotive use.
Lithium batteries are now the most durable and reliable power sources for overland vehicles on the market.

Image Source: https://relionbattery.com/
Lithium is widely agreed to be the best type of battery for overlanding if you can afford it. But most versions can only be used as a house battery as they don’t have the cold cranking amps to start a vehicle. They also need specialized chargers, so be prepared to factor that into your budget.
Recently, a new battery has been developed to shake up the market. A 12-volt lithium dual-purpose deep-cycle starting battery that can do it all. Curious? We’ll cover it in a few sections.
If you want to head straight to buying it, go to this link: Dakota Lithium 135ah DL+
How Much Power Do You Need for Overlanding?
To figure out your battery’s energy capacity and the voltage you need, you need to know the difference between watt-hours (Wh) and amp-hours (Ah):
- Watt-hours (Wh) measure the capacity of power (watts) moving over time. E.g. how many watts a fan uses in one hour.
- Amp-hours (Ah) measure charge and how much current a battery supplies for certain lengths of time. For example, a 100 Ah battery expels 100 amps in one hour or 200 amps in two hours.
While they’re separate units of measurement, they’re still related. You can use one to work out the other.
Watt Hours = Amp Hours x Volts
Amp Hours = Watt Hours / Volts
A 12V battery rated for 200 Ah will give you 2560 Wh (12.6 multiplied by 200; a 12V battery is actually 12.6 volts). A higher voltage 24V battery rated for 100 Ah will give you the same watt-hours.
To figure out the overall Ah you’ll need, you have to add up the Wh for all your devices. You can use a Wattmeter for this or check the power supply label on each of your items for the amperage and use this formula:
Daily Power Needs (Watts) = Hours of Use Per Day x Amps Drawn Per Hour x Volts
For example, let’s say you have a laptop that takes one hour to charge. It draws around 15 amps when charging on 12-volt DC (direct current) and lasts for 24 hours after that.
So your power need for your laptop would be:
1 hour x 15 amps x 12.6 volts = 189 Wh
Use this formula to add up all your devices, and you may end up with something like this:
- Cellphone = 20 Wh
- Laptop = 189 Wh
- Fridge = 260 Wh
- Tent fan = 192 Wh
- LED lights = 3 Wh
- Overall = 654 Wh
Time to figure out the Ah. But bear in mind, you should never let your batteries get below a certain percentage (50% for AGM and 20% for lithium). Otherwise, you risk drastically lowering the life of your battery.
That means for this 654 Wh example, you would need a 100 Ah battery to sustainably power your stuff every day. This would give you enough power to avoid discharging the battery below recommended levels and ensure you make sure of its full life.
Of course, that’s assuming you recharge your battery to full every day. If you need that power to last multiple days between charging, you’ll need an even bigger battery.
Do You Need a Dual Battery Setup for Overlanding?
A dual battery system relies on two batteries to power your vehicle and devices instead of one. If a single battery fails, it means you won’t get stuck in a potentially sticky situation.
This setup includes:
- A main battery (“starting battery”) for engine and vehicle usage
- A secondary battery (“house battery”) for home comforts
The amount you spend on your dual battery setup will depend on a few factors:
- How long will you be off-grid on your overland trip?
- Will you be traveling in a sunny climate (and able to use solar power)?
- Will you be stopping for long periods?
- Do you overland travel solo or in a group?
All these things will affect the amount of power you need and the way you’ll charge your setup. You could decide to go for:
- A traditional setup of two lead-acid batteries with a DC-DC charger
- A mixed chemistry setup of AGM and lithium-ion
- A solar generator that uses panels to capture and store the sun’s energy for use as your secondary battery
You can use an AGM or lead acid battery as your starter battery and lithium for your house battery. Just remember, you’ll need a battery management system to run mixed chemistry.
Here’s an example of a system that includes lithium batteries and solar power:
But what about this single battery that can do it all?
Which Is the Best Battery for Overlanding?
There isn’t one type or setup that beats the rest. It’s down to personal preference and how you’ll be charging it. But before you make your decision, check out the Dakota Lithium 280ah DL+.

This single lithium battery is definitely the most expensive option. But that’s because it’s built for dual performance. It’s the most capable and reliable on the market. And it could make dual battery power systems a thing of the past.
As we know, many lithium batteries can’t be used as a starter for trucks and campers. But the Dakota Lithium has 135 Ah of deep-cycle performance plus 1,000 CCA (cold-cranking amps) of engine starting power.
CCA refers to the power needed to start an engine in cold temperatures. And temperature has a big effect on the available starting power of your battery and the amount you need to start your vehicle.

Image Source: https://autobatteries.com/
To put into perspective, 1,000 CCA is enough for a bus or large RV. This versatile battery is even suitable for EVs (electric vehicles), fishing vessels, and golf carts.
Compared to a standard vehicle battery, this LiFePO4 battery:
- Weighs half the amount
- Charges 5x faster
- Has 5x the power
- Lasts 5x as long
- Costs one-fifth in product lifetime value
It also comes with an 11-year warranty, and a LiFePO4 charger included.
Last thing: there will always be risks when traveling with a single battery (even one as awesome as this!). So, always bring a portable jumper pack in case of an emergency to get you back on the road.
Battery Charging Options
Charging is another big thing you have to take into consideration. You can get by using your alternator if you won’t be stopping for long and properly set up a DC/DC charger. But if you’re going to be off-road and stationary for long periods, you’ll need to look into other options like solar power.
Alternator Charging
In most standard vehicles, your starter battery gets the engine going. After that, the alternator takes over by converting the mechanical gas-powered energy from the engine into electricity. The alternating current (AC) is transformed into a direct current (DC) that charges and gets stored in the battery.
If you’re going to be driving a lot on a short trip and not stopping for long, you may not need extra charging capabilities. Especially if you only want to charge your phone or some LED lights. (Although it’s always wise to have a backup plan in case of power failure.)
You can even use your vehicle’s electrical system with a fairly cheap inverter. Simply plug your devices into the inverter and then the whole thing into your vehicle’s 12V outlet:

You can also use your alternator to charge your house battery (if you have a dual setup). Just make sure you have an isolator installed to protect your starter battery.
Because lithium batteries charge so much faster than traditional types, be aware that you can damage your alternator by connecting them to a lithium bank. A DC-DC charger controller (that limits the draw on the alternator) or a lithium battery isolation manager will prevent this by disconnecting the batteries every so often.
Solar Panels
If you stop frequently, you need to look into other methods of charging. Traveling somewhere sunny? Solar panels can be the perfect solution to keep your batteries juiced up.
Solar PV (photovoltaic) panels convert sunlight into electricity. They use a semiconductor layer contained in solar cells, which use the movement of electrons to produce power.
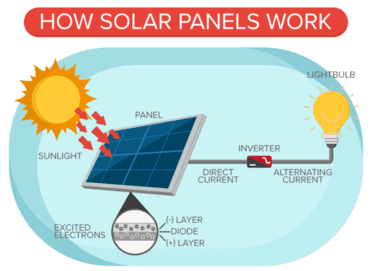
Image Source: https://medium.com/
You can mount these to the roof rack of your vehicle or keep them portable to take in and out when you want. Just make sure you’ll have enough physical space to store them inside.
Permanent solar systems require a few pieces to operate smoothly, including:
- Solar panels
- A battery to store the power
- A solar charge controller (to ensure you don’t overcharge and damage your battery)
- An inverter if you want to power 110V devices or appliances (REDARC is a popular brand)
- A fuse or fuse box to prevent fires due to malfunctions
Check out this video if you’d like to try wiring your own:
If you’d prefer to plug and play without installation, consider a portable power station like the Jackery Explorer 300:
Whichever you choose, make sure it fits your devices and daily power needs.
Related Reading: Overland Solar Setup: Exactly How to Power Your Adventures
Shore Power
Shore power is another name for the AC electrical grid or mains supply. It’s called that because ships and boats use the system in marinas or harbors to recharge.
If you’ll be off-grid, shore power won’t be an option. However, if you’ll be stopping at a campsite with mains power supply, consider installing a hookup. It’s also a great option for supplementing solar power on cloudier days.
Here’s how it could look:
Shore power uses an AC circuit, so you can run AC appliances to it directly. If you want to charge your 12v batteries, you’ll need to transform the AC power to DC. If you’ll be using it to charge your house battery, you’ll need the right converter to support the specific battery type. This handy guide can walk you through the best choice in more detail.
How to Wire Your Overland Battery Setup
The way you wire your overland battery setup will depend on the type you’ve chosen. (Once again, we’re not professional electricians, so consult one if you’re unsure of what you’re doing.)
If you’ll be charging your house batteries with your alternator, it’s a pretty simple setup. You’ll just need to install a DC-DC charger. One of these acts as both a smart-charger and battery isolator.
If you choose to use a non-isolated charger (like the diagram below), you need a good ground point to connect both batteries to. (This can be as simple as a large bolt through the metal bodywork.)

Image Source: https://thispairgothere.com/
For this setup, you’ll need:
- The DC-DC charger of your choice (I recommend Victron)
- Two circuit breakers (60A) to protect the batteries from current surges
- 8 AWG single core wire (13 feet of red and 13 feet of black)
- Assorted cable lugs (these make it simpler and safer to connect the wires and battery)
If you’ll be using solar power, the wiring setup is a little more complex This video covers the basic solar parts you’ll need if you’ll be attempting it yourself:
It includes:
- The two best types of solar panels (monocrystalline or polycrystalline) to capture the sun’s energy
- A solar charge controller to regulate the power
- The battery of your choice (lead-acid, AGM, lithium) and an inverter to convert the power depending on the appliance
- An isolator that lets you charge your solar battery bank with the engine alternator
- Busbars that are an extension of your battery terminals to let you connect multiple wires
- A battery monitor and shunt that tell you the status of your batteries (including capacity and voltage)
- Wires that transport power between components measured by gauge (the higher the gauge, the smaller the wire)
- A distribution block that lets you run all your wires to different accessories, plus fuses that protect them from malfunction
- Wire lugs that let you make nice clean connections from the wires to the busbars or distribution blocks
- An AC breaker box and breaker to protect the wiring of your 110V circuits (your inverter/charger may have come with one already installed)
- 100V outlets for normal household plugs and the box that you’ll install it into
- A shore power plug for an exterior power port to save an extension cord running between the door (optional)
- 12V switches and outlets for appliances like USB adapters and laptop chargers
Pro tip: avoid 12V pre-installed USB outlets from Amazon. Instead, choose 12V outlets with flush mount USB adapters for more versatility and to future-proof your build.
Here’s an example of what yours could look like:

Image Source: Greg Virgoe
If you’d like to see a full van DIY electrical installation that includes wiring the:
- Battery bank
- Lynx distributor (modular busbar)
- Chassis ground
- Inverter/charger
- 120V AC distribution panel
- 12V DC distribution panel
- Shore power
- Solar charging
- Alternator charging
Check out this video:
Which Battery Setup Will You Be Trying?
Wherever you are in the wild, we’ve proven you don’t need to give up those home comforts. Whether you go for a single lithium or a dual battery setup, you should now have all the knowledge to make an informed decision.
Those of us who have been in this game for a while are constantly tweaking and upgrading our overlanding battery systems. It’s an exciting time, technology is constantly improving, and new options keep popping up on the market. So, keep an eye out for the next big thing!
Read Next:


